For marketers, tool integration is essential for tracking performance (and for saving precious time). While Zoom has become the go-to platform for audio and video conferencing, its webinar features are limited for marketing purposes. This means many businesses want to integrate Zoom with HubSpot, so the data can be synced with HubSpot’s CRM.
Unfortunately, it can be difficult to get the two platforms to sync correctly — especially without reading a giant manual. Nobody has time for that.
Since we’ve set up HubSpot-Zoom integrations for countless clients at this point, today we’re going to walk you through how to cleanly connect HubSpot and Zoom, so you can easily track webinar data in your marketing campaigns. You can read these step-by-step instructions, or watch the video below for a complete overview.
This process is straightforward, but it’s still going to take time. If you’d like a HubSpot partner to help leverage HubSpot more effectively, reach out and book a call with us.

By the end of this article, people will be able to register for your Zoom webinar on a custom HubSpot landing page, then automatically have their info passed to your HubSpot CRM. This will let you segment the audience, follow up with leads, and continue to nurture these leads after the webinar has passed.
In other words, this integration is an essential part of your content funnel.
Heads up! These instructions only work if you’re on the Pro or Enterprise plans for HubSpot. If you’re on the Starter plan, you’ll need to do a workaround. Additionally, you will need a Zoom webinar license, which is not the same as standard Zoom meetings.
We’re assuming you’ve already set up HubSpot and Zoom, so let’s get started.
Create a Webinar on Zoom
 To start off, let’s create your webinar on Zoom. Select “Webinars” from the left-hand side of the Zoom website once you’ve logged in, and then “Schedule a Webinar.”
- Enter the relevant details and adjust the settings to fit your preferences.
- Be sure to click “automatically record the webinar” so you can send the recording out later as a follow up email. This can be useful for leads who weren’t able to attend the webinar, but wanted to.
- By default, Zoom doesn’t send reminder emails to attend the webinar. However, it’s generally better to use Zoom for these since they automatically include correct meeting links, so turn this on with the “confirmation email to registrants” on your settings page.
- For the reminder email, a good timeframe is 1 day before and 1 hour before (some hosts will also do 5 minutes before just in case, but Zoom doesn’t offer this as a default option). A reminder 1 week prior generally isn’t necessary.
- Once the webinar is created, you should see your webinar ID (which you’ll need to grab later, so you may want to keep this page open for now).
- Feel free to edit the subject line of the email to be more descriptive of what the webinar is about.
- Send yourself a preview email to make sure it all looks good
Connect Zoom with HubSpot
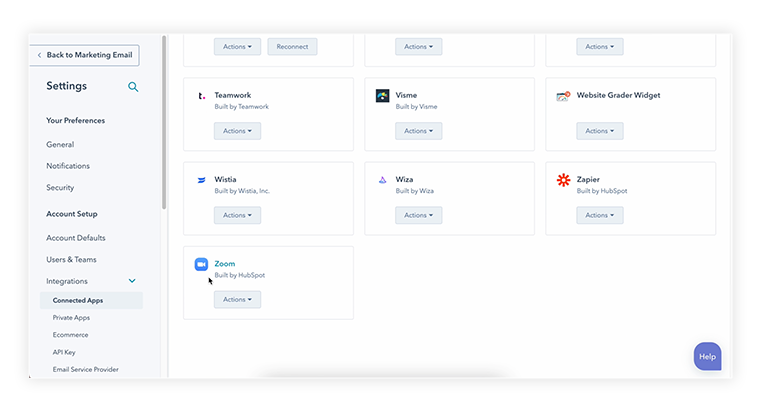 Unfortunately, Zoom doesn’t come preloaded with HubSpot integration. In other words, Zoom doesn’t talk to HubSpot automatically without setting up the integration first. Thankfully, there is a Zoom integration in the HubSpot ecosystem which will help us do just that. (If you already have the Zoom integration installed on HubSpot, you will see it on the list of Connected Apps mentioned below).In HubSpot, click the gear icon in the top right. Go to Integrations dropdown on the left side of the screen, and click Connected Apps (or go directly to the list of connected apps)
- If Zoom isn’t already there, click the button to visit the App Marketplace. Search for Zoom (it will say “by HubSpot” beneath it). Install the app.
- Once set up, select Zoom from the Integrations dropdown mentioned above. At this point Zoom is technically connected, but you will still need to tell it what to do (we’ll get to that)
- Set up any exclusions (such as your own team members) to avoid adding them as webinar contacts, then choose which Zoom user’s webinars will be synced
- If you use webinars for more than just marketing, you may want to uncheck the box that says “sync data from newly scheduled webinars.” If left checked, any new webinar you create will be automatically synced to HubSpot.
- Now that these are synced, a new contact can be created in HubSpot whenever someone registers for a Zoom webinar. But we’re not quite done yet!
Create your signup form and custom landing pages on HubSpot
 On HubSpot, you will need to create a landing page to send your audience to. This is where they’ll be able to register for the Zoom webinar. First though, you’ll need to create a signup form to insert into this page.
Here we’re going to create:
- A form for your audience to enter information and register
- A landing page to host that registration form
- A thank you page to confirm registration upon submission of the landing page
- A branded confirmation email to send registrants (different from Zoom confirmation email)
Remember you will also need another landing page to host the webinar when it actually happens.
First, create a form to register for the webinar
Forms are pretty straightforward, but there are a few quirks if you're wanting some customization. If you need a bit of guidance here, check out the knowledge article from HubSpot about how to create HubSpot forms.
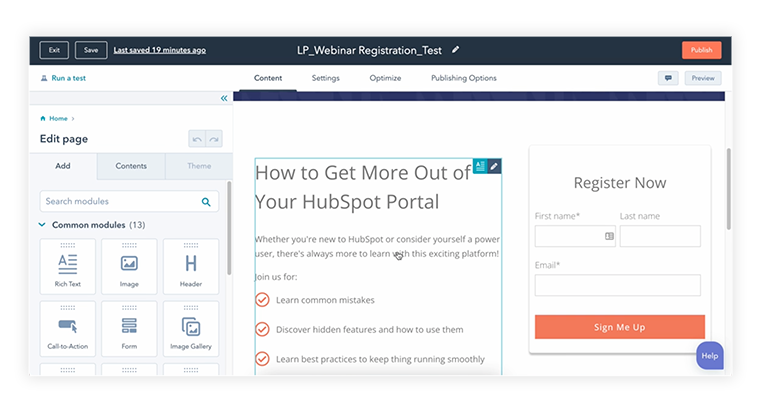
Create a Zoom webinar registration page in HubSpot
Now you’ll need a page to put this form. To create a registration page in HubSpot for your Zoom webinar:
- Under Marketing, click Landing Pages
- Create a page, telling the viewer what they’re going to get from the webinar
- You may also want to summarize, at a glance, the key takeaways they can expect to get from the webinar
- Add your form to this page
- In Settings, add the description and metadata for the page, and connect it to whichever Campaign this webinar will be a part of
- Publish the page!
Create the Thank You page (confirmation page) in HubSpot
After they submit their form to register, you’re going to want each registrant to land on a new page to tell them they’ve successfully registered. You might also want to use this page to remind them to check their email for further details.
If you’ve never created a landing page in HubSpot, you can watch this HubSpot landing page setup video for the full walkthrough.
- Again, under Marketing, click Landing Pages
- Create a basic confirmation page, showing they successfully registered for the webinar. Customize this however you’d like, such as adding logos and any other information. Bear in mind people might not always read this page as closely as an email, so a little redundancy is okay.
- Edit the settings to your preferences
- Publish!
Thank you pages are a great place to showcase other resources that your audience might find useful. If you have a consistent set of links or resources that you want to include and don’t want to type it every single time, you can create standardized Saved Sections in HubSpot. These let you easily reuse chunks of content on any of your pages.
Set up the first landing page to automatically send visitors to the confirmation page
Now you need to link the two landing pages you made, so that users will automatically get redirected to the confirmation page when they submit the form.
- Click the form, and under “What will a visitor see after submitting your form” select “redirect to another page”
- Select your thank you page from the dropdown menu under “Redirect Link”
Create a branded, Automated Email to come from your company via HubSpot
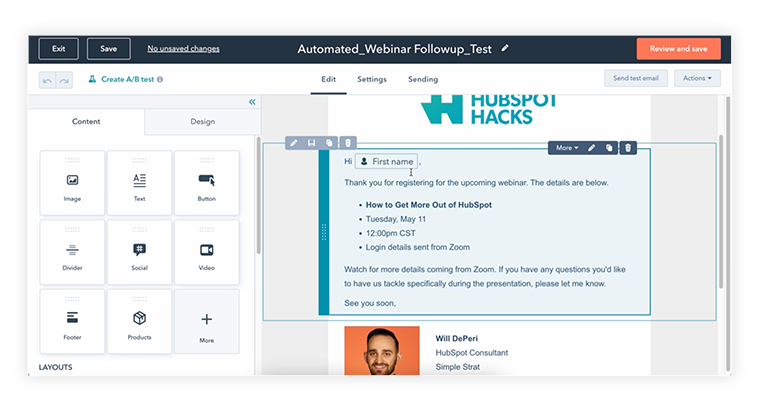 You’ve set up the reminder emails to come from Zoom, but you’ll still want to send a more personalized, human email to come from your company. This email is to give them a heads up about the webinar, telling them more about yourself, and providing a face for your business.
You can set this up to send automatically in HubSpot. First though, let’s create the email:
- Create email > Automated email
- Design and write the email to your liking. You’ll probably want to include a logo, a personalization token to show their name in the greeting (instead of something gross like “Dear valued customer”).
- List the details of the webinar: the title/subject of webinar, the time and date, and how they can join it.
- Provide a point of contact for your company, whether it’s the webinar host, or a good person to contact with questions before or after the webinar.
- Publish the email when ready. There’s no need to select a day for the email to go out, since it’ll be automated based on a trigger
For more info on this, watch our HubSpot Email Marketing demo, or watch the full HubSpot email marketing playlist, which includes everything you need to get started with email in HubSpot.
Set up the HubSpot workflow to sign up registrants for the Zoom webinar
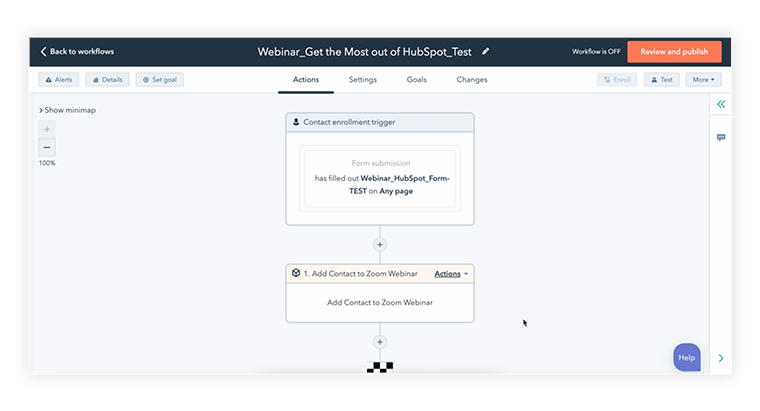 Now, for the reason you probably want to integrate Zoom with HubSpot in the first place: automatically sending new webinar registrants into a marketing automation workflow.
Workflows will tell HubSpot what to do and where information should be sent when there’s activity on the pages. This is how you’ll send registrants the email you just created, and how you’ll organize their contact information within the CRM.
If you’ve never set up a workflow before, watch our video on creating a HubSpot workflow.
- Go to Automation > Workflows
- Create a new workflow, clicking Contact Based under the “Start from Scratch” section
- Click “set up triggers” and select Form Submissions as the trigger, then select the webinar form you just created (you can keep the Any Page option as-is if you’d like, but if you plan to reuse this form for future webinars, you may want to segment this by the page the form is being used on)
- Click the + button in the workflow map to add another action, and select “Add Contact to Zoom Webinar”
- Add the Zoom webinar ID in the text field (remember, this is back on the Zoom webinar page you made earlier)
- Optional action to add – if your version of HubSpot gives you the option to add users as a marketing contact, you’ll want to select that here
- Create a delay for at least 1 minute
- Create another action to send an email, selecting the confirmation email you just made. This means they’ll receive this email, on top of the basic informational emails from Zoom (with meeting links)
- You may also want to do more segmentation here, such as adding them to a list for this webinar, marking them as a marketing lead (or similar stage in buyer journey), or mark them as having attended a webinar
- If you’d like, you can “send an internal email notification” to send a confirmation to certain users or team members whenever someone signs up for the webinar. You can personalize this email to autofill the details of each person who signs up.
- Review the final settings for your workflow and then turn it on!
If you set your webinar to record in Zoom, you can also automatically send a follow-up email with the webinar recording in the days following the webinar.
Test your integration!
We just built a complex process here, so great work! Before you start promoting it however, you want to be confident that everything is working properly, as any integration can get buggy at times.
- Go to the registration page, fill it out, and submit it to make sure the registration works
- When confirming the new contact activity in HubSpot, it might take a minute, so don’t panic
- On the info page for a contact in HubSpot, you should see a little Zoom logo with a description that the contact has registered for a webinar
- After your preset delay, you will also see the automated email you sent from HubSpot
- You can also confirm at the bottom of the Zoom webinar info page to see how many registrants you have (under Edit, you can see the names of the registrants)
If everything is working, you’re ready to start promoting your webinar and driving traffic to your landing page!
Time to turbocharge your webinars
Webinars are a powerful tool for any marketing campaign, but only if you know what you’re doing with the information your audience gives you. A strategic Zoom and HubSpot integration like this helps you organize and handle your webinar contacts, so you can turn more audience members into customers.
Integrating HubSpot and Zoom can seem a little complicated at first, but once you’ve gone through it once, you’ll find it’s actually pretty easy. Once the two services are connected, you just need to create a place for information to be entered in HubSpot (your landing page and form), and to specify what happens when information is entered there (where the info goes, which webinar the user is registered for, and which confirmation page they see).
From there, just make sure you follow up with reminders and an introductory email to give them a face to associate with your brand!
As a sidenote, you can also promote with LinkedIn lead events and sync that with Zoom and Zapier, if you want to get even larger reach with your webinar. Learn more about that in this video.
If you need more help maximizing the return of your HubSpot investment, don't hesitate to get in touch.